
HTML
agent-cli
A beautiful Terminal UI for launching multiple AI providers from a single command
★ 30⑂ 727 Des 2025
A beautiful Terminal UI for launching multiple AI providers from a single command
A beautiful Terminal UI for launching multiple AI providers from a single command
A beautiful Terminal UI for launching multiple AI providers from a single command


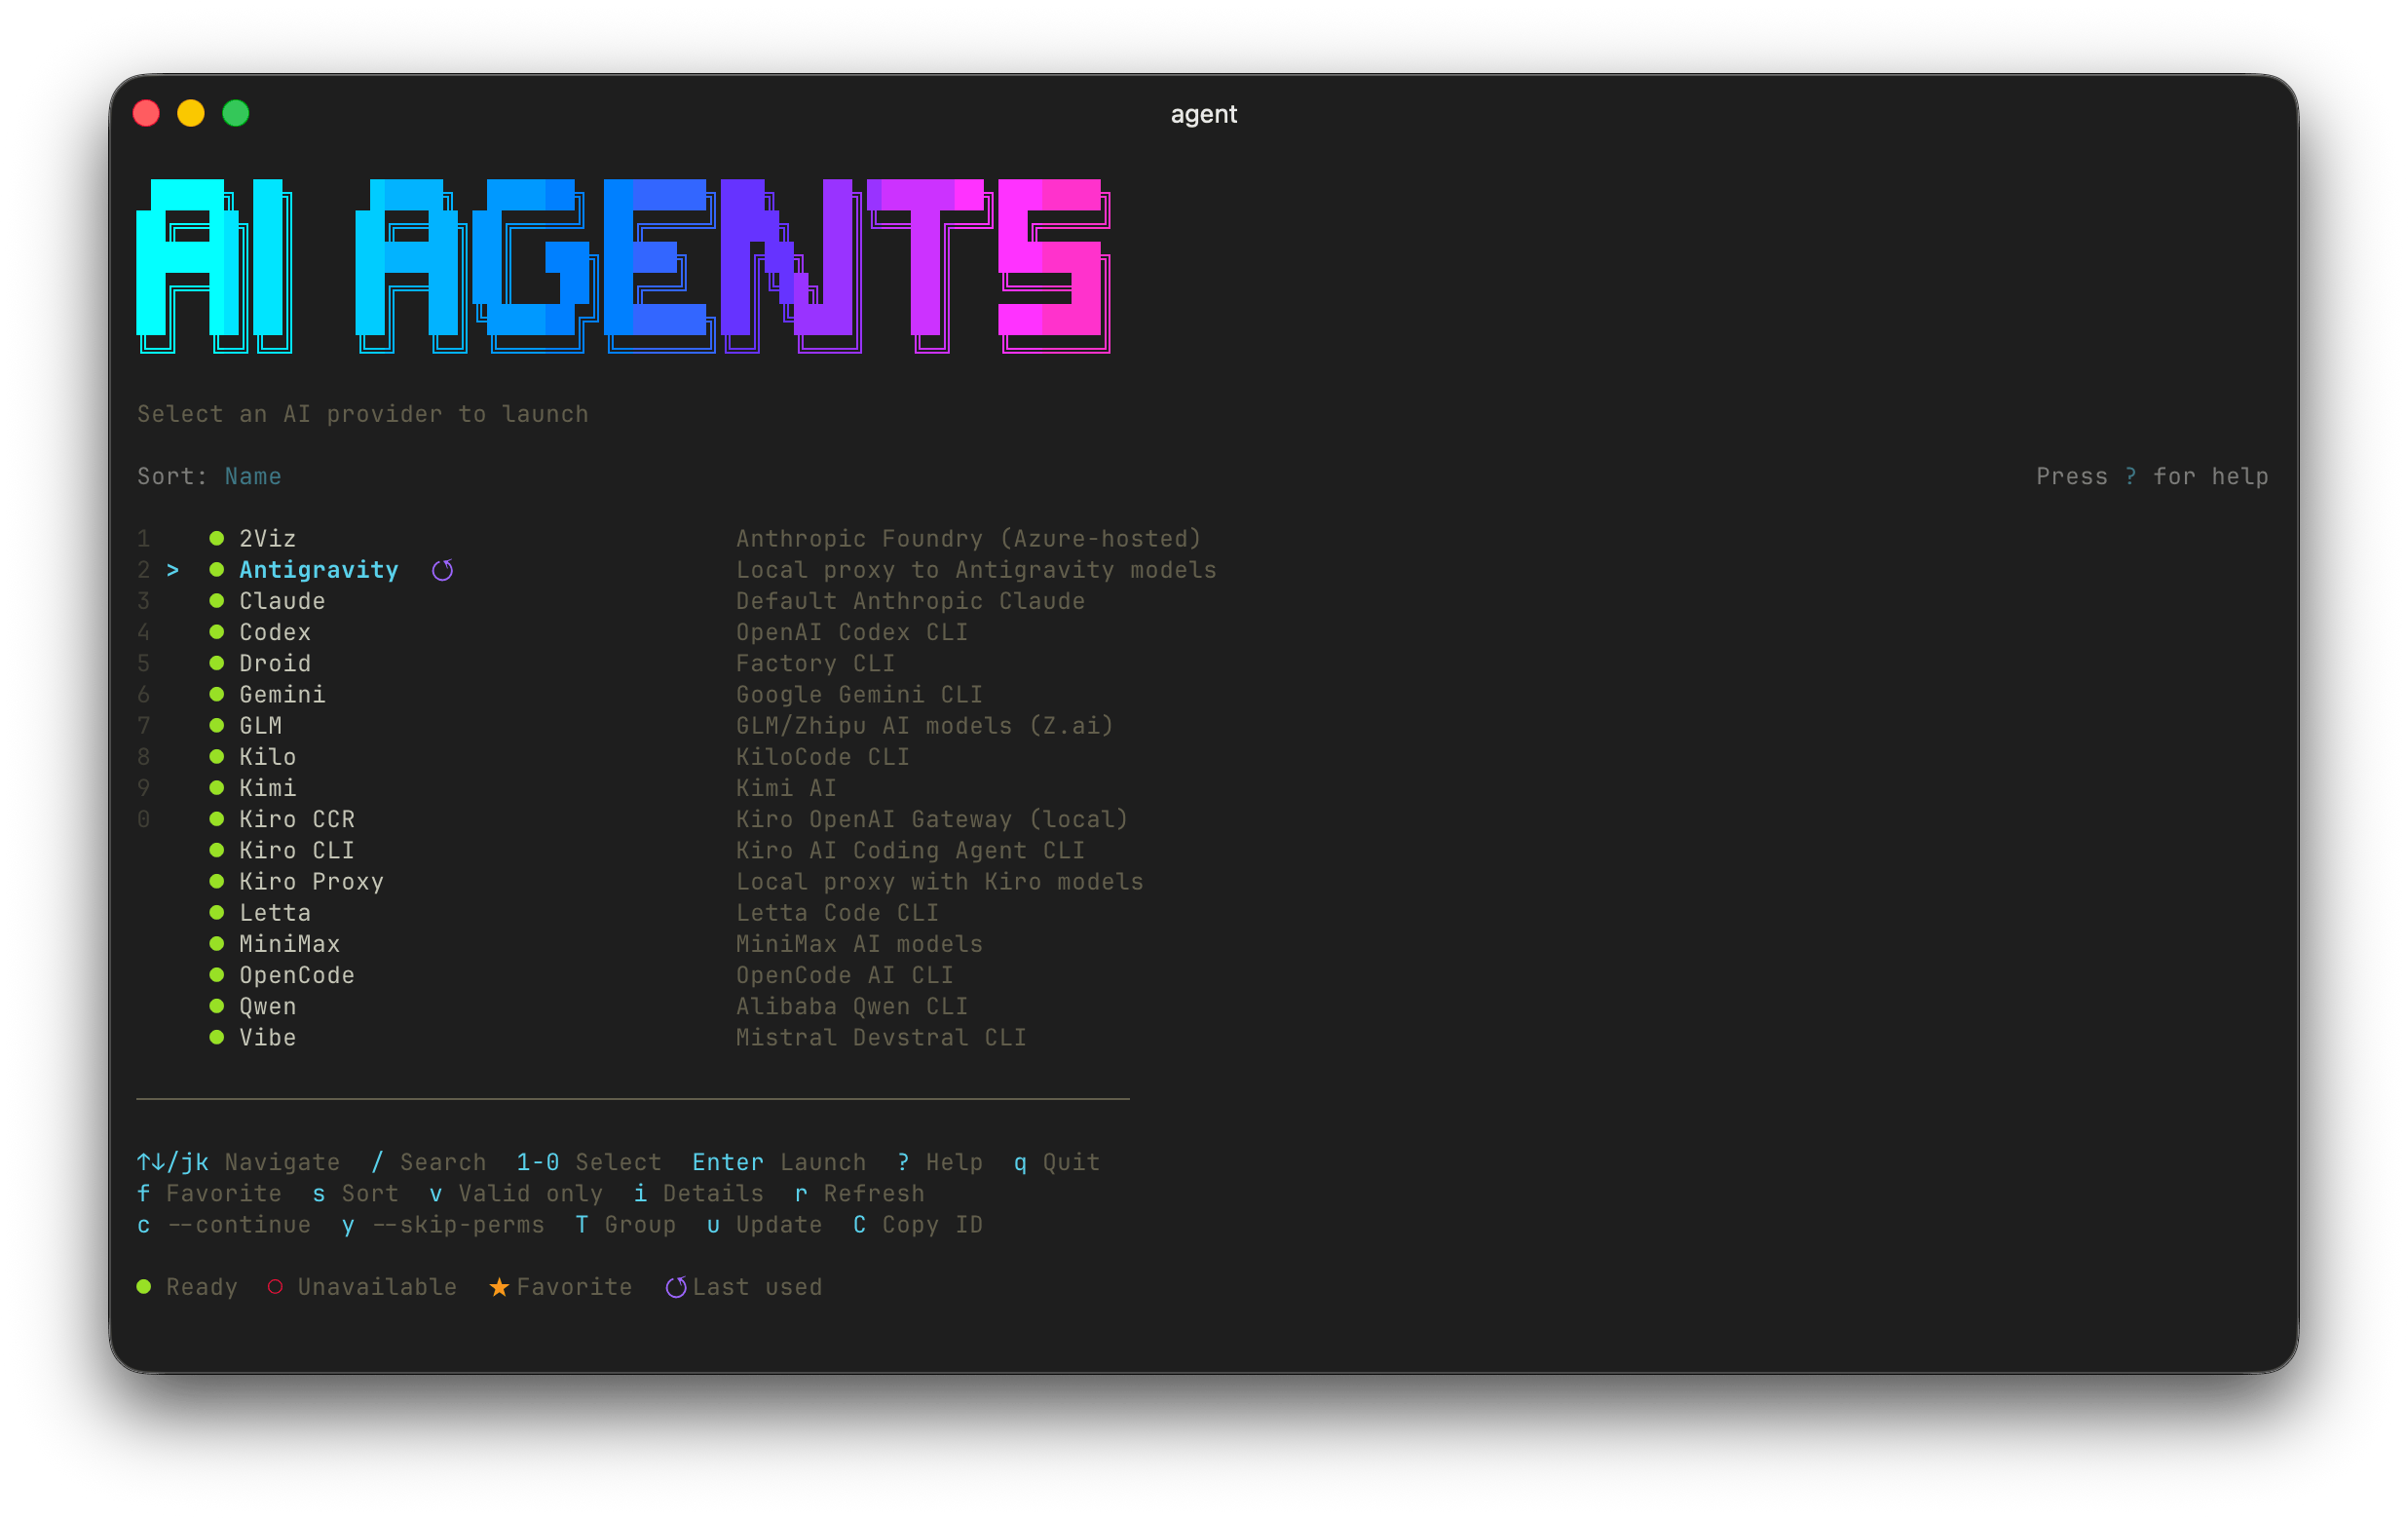
Managing multiple AI CLI tools is painful. Each provider has its own command, configuration, and environment variables. Agent CLI solves this by providing:
agent| Platform | Status | Notes |
|---|---|---|
| macOS | ✅ Fully Supported | Native support |
| Linux | ✅ Fully Supported | Native support |
| Windows | ✅ Supported via WSL2 | Recommended approach |
For the best experience on Windows, we recommend using WSL2 (Windows Subsystem for Linux):
Install WSL2 (if not already installed):
# Run in PowerShell as Administrator
wsl --install
Install Node.js in WSL2:
# Inside WSL2 terminal
curl -fsSL https://deb.nodesource.com/setup_20.x | sudo -E bash -
sudo apt-get install -y nodejs
Clone and install Agent CLI:
git clone https://github.com/galpratama/agent-cli.git
cd agent-cli
npm install
npm run link
Install your AI CLI tools (e.g., Claude):
npm install -g @anthropic-ai/claude-code
Why WSL2? Most AI CLI tools (Claude, Codex, etc.) are designed for Unix-like environments. WSL2 provides the best compatibility and performance on Windows.
Agent CLI works natively on Linux. Just ensure you have Node.js 18+ installed:
# Ubuntu/Debian
curl -fsSL https://deb.nodesource.com/setup_20.x | sudo -E bash -
sudo apt-get install -y nodejs

# Fedora
sudo dnf install nodejs

# Arch Linux
sudo pacman -S nodejs npm
Then follow the standard installation steps below.
# Clone the repository
git clone https://github.com/galpratama/agent-cli.git
cd agent-cli

# Install dependencies
npm install

# Build and link globally
npm run link
# Launch interactive provider selection
agent

# Or launch a specific provider directly
agent claude
| Provider | Type | Category | Description |
|---|---|---|---|
| Claude | API | Anthropic | Default Anthropic Claude |
| OpenRouter | API | OpenRouter | Access multiple AI models via OpenRouter |
| MegaLLM | API | MegaLLM | Access multiple AI models via MegaLLM |
| Foundry Azure | API | Anthropic | Azure-hosted Anthropic Foundry |
| GLM | API | Chinese | GLM/Zhipu AI models (Z.ai) |
| Kimi | API | Chinese | Kimi AI |
| MiniMax | API | Chinese | MiniMax AI models |
| Codex | Standalone | CLI | OpenAI Codex CLI |
| Vibe | Standalone | CLI | Mistral Devstral CLI |
| OpenCode | Standalone | CLI | OpenCode AI CLI |
| Gemini | Standalone | CLI | Google Gemini CLI |
| Kilo | Standalone | CLI | KiloCode CLI |
| Qwen | Standalone | CLI | Alibaba Qwen CLI |
agent                    # Launch interactive provider selection
agent <provider>         # Launch specific provider directly
agent <provider> "prompt" # Launch with initial prompt
agent --continue         # Resume last Claude session
agent --dangerously-skip-permissions  # Skip permission prompts
agent --fallback         # Auto-fallback to next provider on failure
agent list               # List all providers with status
agent check              # Validate all provider configurations
agent providers          # Manage provider configuration
agent providers --config # Show config file path
agent setup [provider]   # Interactive setup wizard
agent last               # Launch last used provider
agent history            # Show session history
agent stats              # Show usage statistics
agent profile <name>           # Launch saved profile
agent profile-save <name>      # Save new profile
agent profile-save <name> -p claude --continue  # Save with options
agent profile-list             # List saved profiles
agent profile-delete <name>    # Delete profile
agent update             # Update agent-cli itself
agent update-tools       # Update all standalone AI CLI tools
agent update-tools gemini # Update specific tool
agent config             # Interactive TUI for managing providers
agent providers          # List/manage providers (CLI)
agent providers --config # Show config file path
agent setupvsagent config— These commands serve different purposes:
Command Purpose Scope agent setupConfigure API keys (environment variables) Shell profiles ( ~/.zshrc,~/.bashrc)agent configManage provider definitions (add/edit/delete providers) Provider config ( ~/.agent-cli/providers.json)Use
agent setupwhen you need to add or check API keys for providers. Useagent configwhen you need to add custom providers, edit provider settings, or enable/disable providers.
| Key | Action |
|---|---|
↑ / k |
Move up |
↓ / j |
Move down |
g |
Go to first item |
G |
Go to last item |
1-9, 0 |
Quick select (1-10) |
Enter |
Launch selected provider |
q |
Quit |
| Key | Action |
|---|---|
/ |
Start fuzzy search |
Ctrl+1-9 |
Filter by category |
v |
Toggle show valid providers only |
Esc |
Clear search/filter |
| Key | Action |
|---|---|
f |
Toggle favorite (favorites appear at top) |
s |
Cycle sort mode (Name/Usage/Last/Category) |
T |
Toggle category grouping |
| Key | Action |
|---|---|
? |
Show help overlay |
i |
Show provider details panel |
r |
Refresh validation status |
u |
Update standalone provider |
e |
Open config TUI |
C |
Copy provider ID to clipboard |
| Key | Action |
|---|---|
c |
Toggle --continue mode |
y |
Toggle --skip-permissions mode |
Agent CLI stores provider configuration in ~/.agent-cli/providers.json. You can customize providers, add new ones, or override existing settings.
# Copy example configuration
cp providers.example.json ~/.agent-cli/providers.json

# Or use the setup wizard
agent setup
{
  "$schema": "./providers.schema.json",
  "providers": [
    {
      "id": "claude",
      "name": "Claude",
      "description": "Default Anthropic Claude",
      "icon": "",
      "type": "api",
      "category": "anthropic",
      "configDir": "~/.claude",
      "envVars": {},
      "validation": { "type": "env" }
    }
  ],
  "disabled": [],
  "overrides": {}
}
| Property | Type | Description |
|---|---|---|
id |
string | Unique identifier (lowercase, alphanumeric, hyphens) |
name |
string | Display name |
description |
string | Short description |
icon |
string | Emoji/icon for display |
type |
string | api, proxy, gateway, or standalone |
category |
string | anthropic, chinese, local, or standalone |
configDir |
string | Configuration directory (supports ~) |
envVars |
object | Environment variables to set |
envMappings |
object | Map source env vars to target env vars |
validation |
object | Validation configuration |
command |
string | Command to run (standalone providers) |
defaultArgs |
array | Default arguments for command |
updateCmd |
array | Update command for standalone providers |
models |
array | Available models for multi-model providers |
modelEnvVar |
string | Environment variable to set selected model |
Some providers support multiple models. When you select such a provider, a model picker appears allowing you to choose which model to use.
{
  "id": "megallm",
  "name": "MegaLLM",
  "type": "api",
  "models": [
    "deepseek-v3.2",
    "qwen3-coder-480b-a35b-instruct",
    "llama3.3-70b-instruct",
    "mistral-large-3-675b-instruct-2512"
  ],
  "modelEnvVar": "ANTHROPIC_MODEL"
}
models - Array of model identifiers available for this providermodelEnvVar - The environment variable that will be set with the selected modelThe model picker supports:
j/k)/)1-9, 0)Esc)// Check if environment variable is set
{ "type": "env", "envKey": "ANTHROPIC_API_KEY" }
// Check if URL is reachable
{ "type": "http", "url": "https://api.example.com/health" }
// Check if command exists
{ "type": "command", "command": "gemini" }
Map your existing environment variables to provider-specific ones:
{
  "envMappings": {
    "Z_AI_API_KEY": "ANTHROPIC_AUTH_TOKEN"
  }
}
This maps your Z_AI_API_KEY to ANTHROPIC_AUTH_TOKEN when launching the provider.
Claude works out of the box if you have the Claude CLI installed:
# Install Claude CLI
npm install -g @anthropic-ai/claude-code

# Authenticate
claude auth
OpenRouter provides access to multiple AI models through a unified API:
# Set your OpenRouter API key
export OPENROUTER_API_KEY="your-api-key"

# Launch
agent openrouter
Get your API key from OpenRouter.
MegaLLM provides access to various AI models with model selection support:
# Set your MegaLLM API key
export MEGALLM_API_KEY="your-api-key"

# Launch (will show model picker)
agent megallm
Supported models include:
# Set your Z.ai API key
export Z_AI_API_KEY="your-api-key"

# Launch
agent glm
# Set your Kimi API key
export KIMI_API_KEY="your-api-key"

# Launch
agent kimi
# Set your MiniMax API key
export MINIMAX_API_KEY="your-api-key"

# Launch
agent minimax
# Set your Foundry API key
export ANTHROPIC_FOUNDRY_API_KEY="your-api-key"

# Configure resource name in providers.json
# Launch
agent foundry-azure
For standalone providers like Codex, Gemini, etc., install them first:
# Codex
npm install -g @openai/codex

# Gemini
npm install -g @anthropic-ai/claude-code

# Vibe
npm install -g vibe-cli
You can add custom providers to your configuration:
{
  "providers": [
    {
      "id": "my-custom-provider",
      "name": "My Custom AI",
      "description": "My custom AI provider",
      "icon": "",
      "type": "api",
      "category": "local",
      "configDir": "~/.my-custom-ai",
      "envVars": {
        "ANTHROPIC_BASE_URL": "https://my-api.example.com"
      },
      "envMappings": {
        "MY_API_KEY": "ANTHROPIC_API_KEY"
      },
      "validation": {
        "type": "env",
        "envKey": "MY_API_KEY"
      }
    }
  ]
}
Each provider gets its own configuration directory. This allows you to:
Agent CLI creates isolated credential storage for each provider, ensuring your API keys and tokens don't conflict between providers.
When using --fallback, if a provider fails (non-zero exit code), Agent CLI automatically tries the next available provider in the same category.
agent claude --fallback
# If Claude fails, tries next Anthropic provider
# Clone the repository
git clone https://github.com/galpratama/agent-cli.git
cd agent-cli

# Install dependencies
npm install

# Run in development mode
npm run dev

# Watch mode for TypeScript compilation
npm run watch

# Build for production
npm run build

# Link globally for testing
npm run link
agent-cli/
├── src/
│   ├── cli.tsx              # Main CLI entry point
│   ├── components/
│   │   ├── App.tsx          # Main React component
│   │   ├── Header.tsx       # ASCII art header
│   │   ├── Footer.tsx       # Keyboard shortcuts
│   │   ├── ProviderList.tsx # Interactive provider list
│   │   ├── ProviderItem.tsx # Provider list item
│   │   └── StatusBadge.tsx  # Status indicator
│   └── lib/
│       ├── providers.ts     # Provider type definitions
│       ├── provider-config.ts # Configuration management
│       ├── launcher.ts      # Provider launching logic
│       ├── validate.ts      # Provider validation
│       ├── config.ts        # User preferences storage
│       └── useMouse.ts      # Mouse event handling
├── providers.example.json   # Example configuration
├── providers.schema.json    # JSON Schema for validation
└── package.json
Contributions are welcome! Please feel free to submit a Pull Request.
git checkout -b feature/amazing-feature)git commit -m 'Add some amazing feature')git push origin feature/amazing-feature)Check if the required environment variable is set:
agent check
Verify your API key is correct:
echo $YOUR_API_KEY
Run the setup wizard:
agent setup <provider>
Make sure npm global bin is in your PATH:
# Add to your shell profile (.bashrc, .zshrc, etc.)
export PATH="$PATH:$(npm config get prefix)/bin"
Check if the underlying CLI is installed:
which claude # or gemini, codex, etc.
Try running the CLI directly to see error messages:
claude --help
Terminal UI not rendering correctly:
echo $TERM should show xterm-256color or similarexport TERM=xterm-256colorPermission denied errors:
# If npm link fails with permission errors
sudo npm run link
# Or configure npm to use a different directory
npm config set prefix ~/.npm-global
export PATH="$PATH:$HOME/.npm-global/bin"
WSL2 not installed:
# Run in PowerShell as Administrator
wsl --install
# Restart your computer after installation
Node.js not found in WSL2:
# Install Node.js in WSL2
curl -fsSL https://deb.nodesource.com/setup_20.x | sudo -E bash -
sudo apt-get install -y nodejs
Cannot access Windows files from WSL2:
/mnt/c/, /mnt/d/, etc.~/projects/)Environment variables not persisting:
# Add to ~/.bashrc or ~/.zshrc in WSL2
export YOUR_API_KEY="your-key-here"
source ~/.bashrc
MIT License - see LICENSE for details.
Made with by galpratama